PlayzerX Programming Guide#
This guide provides a comprehensive overview of how to use the PlayzerX C++ API. PlayzerX is a versatile Vector Graphics Laser Projection system.
This C++ API allows users to initialize and discover PlayzerX devices, connect via serial, configure essential parameters, and send real-time data for scanning or display.
Basic Hardware Setup and Data Flow#
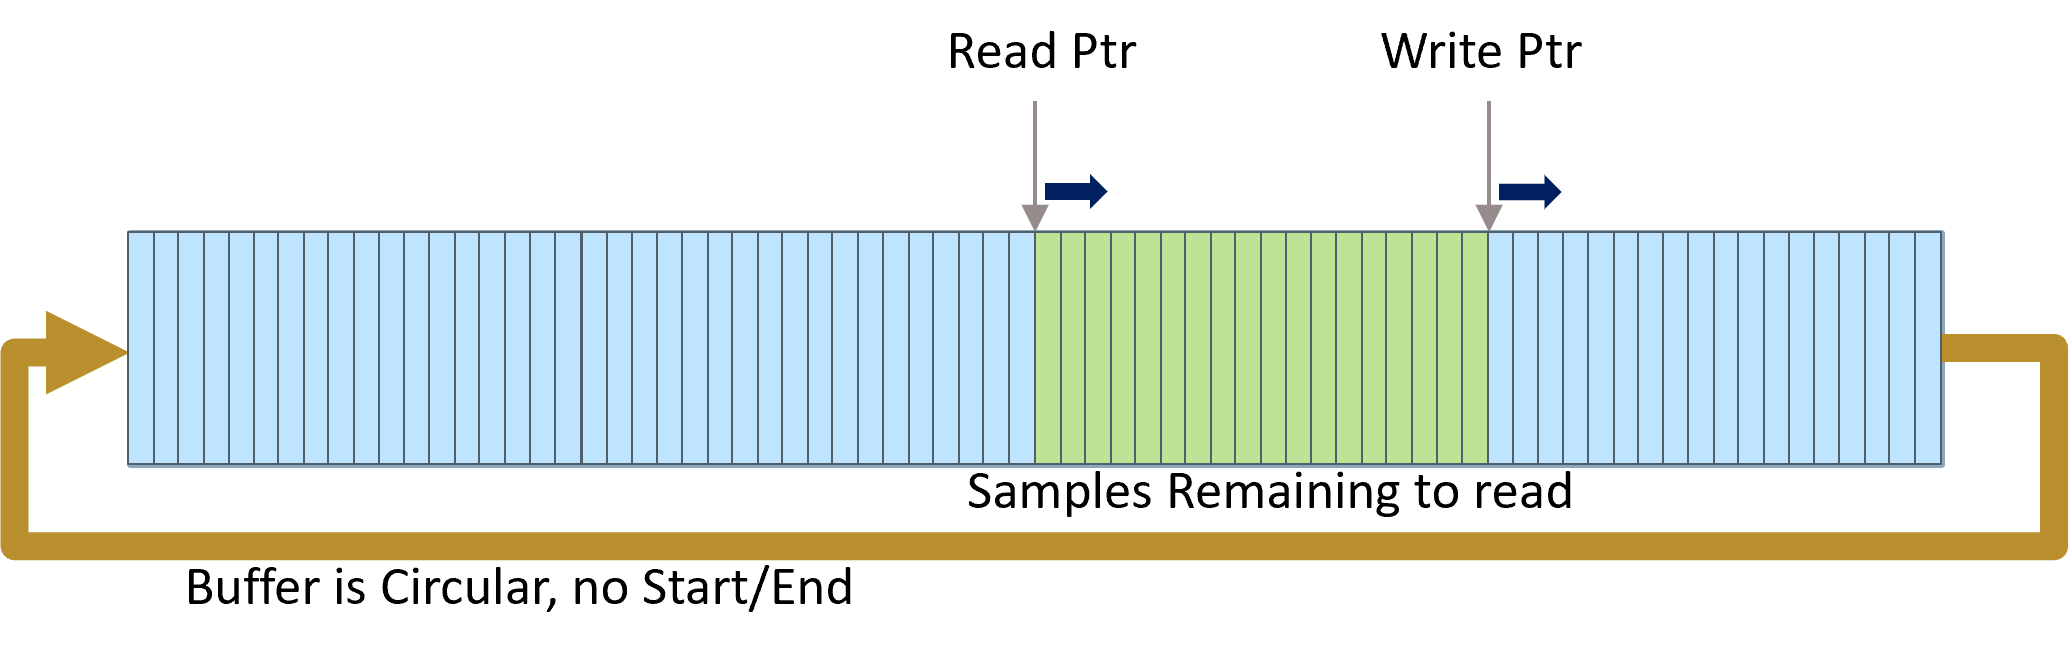
When using a PlayzerX Module in USB mode, the Controller’s buffer is configured as a circular FIFO buffer. The total buffer size is 125,000 samples for the Monochrome version and 83,333 samples for the RGB version.
The Controller continuously operates in reading mode (outputting samples) as long as there are samples available to read,
meaning the Read Pointer has not caught up with the Write Pointer. The reading timing, or the movement of the Read Pointer, is
determined by the SampleRate, which can be set using the playzerx::PlayzerX::SetSampleRate() command (default is 22,000 samples per second).
The writing timing, on the other hand, depends on the data provided by the user over the serial port and can reach up to
approximately 50,000 samples per second. The USB data rate can vary between 500 KB/s and 625 KB/s, but overhead in the API and OS
can set the upper limit on the actual data rate. This is achieved using the playzerx::PlayzerX::SendData() commands.
Before writing new data, users should typically check the playzerx::PlayzerX::GetSamplesRemaining() value to ensure that the buffer requires new data and that there is
sufficient space for it.
Initialize, Search, and Connect#
Initialize the API#
Note
Before using PlayzerX, ensure you have set up your environment, compiler, and acquired the necessary drivers or libraries. Refer to the PlayzerX Quickstart Guide if you are unsure of these prerequisites.
Create a playzerx::PlayzerX device instance by calling playzerx::PlayzerX::CreateDevice():
#include "PlayzerX.h"

using namespace playzerx;

int main()
{
    // Create the PlayzerX device object
    PlayzerX* playzer = PlayzerX::CreateDevice();

    // ...
    // Additional code here
    // ...

    // Finally, clean up
    PlayzerX::DeleteDevice(playzer);
    return 0;
}
The returned pointer is used to call other PlayzerX API functions for device discovery, data streaming, etc.
Search for Devices#
Scan for connected devices and (if desired) present these to the user, letting them pick the target device.
All detected PlayzerX devices, including basic metadata, can be retrieved using playzerx::PlayzerX::GetAvailableDevices().
The structure playzerx::PlayzerXAvailableDevices stores relevant information:
Number of devices found (
playzerx::PlayzerXAvailableDevices::NumDevices)Device names
Firmware strings
Associated COM port numbers/names
You can optionally display a list of all discovered devices in the console with playzerx::PlayzerX::ListAvailableDevices().
#include "PlayzerX.h"
using namespace playzerx;

int main()
{
    PlayzerX* playzer = PlayzerX::CreateDevice();

    PlayzerXAvailableDevices devTable;
    playzer->GetAvailableDevices(devTable);
    playzer->ListAvailableDevices(devTable);

    PlayzerX::DeleteDevice(playzer);
    return 0;
}
If you already know the COM port (e.g. “COM4” on Windows or “/dev/ttyUSB0” on Linux), you do not necessarily need to do this step.
Connect to a Device#
Once you have obtained information about available devices or already know the COM port, you can connect to your target device by using one of the overloaded playzerx::PlayzerX::ConnectDevice() methods:
ConnectDevice() Connects automatically to the first available port found.
PlayzerX* playzer = PlayzerX::CreateDevice();
// Connect to the first discovered device
playzer->ConnectDevice();
ConnectDevice(const std::string &portName) Connects to a specific port name (e.g. “COM5” or “/dev/ttyUSB0”).
PlayzerX* playzer = PlayzerX::CreateDevice();
// Connect to COM5 on Windows (or "/dev/ttyUSB0" on Linux)
playzer->ConnectDevice("COM5");
ConnectDevice(char* portName) C-style version for connecting to a specified port name.
All these methods open the specified COM port and attempt to initialize PlayzerX device communication.
Error Handling#
After an operation, you can check for errors by calling playzerx::PlayzerX::HasError().
Internally, the class sets playzerx::PlayzerX::m_LastError of type playzerx::PlayzerXError.
Possible error codes include:
Example:
if (playzer->HasError())
{
    // Retrieve the error code
    PlayzerXError errCode = playzer->GetLastError();
    // Take appropriate action
}
else
{
    // Continue normal operation
}
Device Configuration#
For users familiar with the Mirrorcle MTIDevice API, the PlayzerX device is a little different in that it does not store a comprehensive parameter structure that is read/written in a single block (such as MTIDeviceParams). Instead, PlayzerX individually sets or queries various operational parameters or device info. Below are some of the most important device configuration functions:
Get Device Information#
Use playzerx::PlayzerX::GetDeviceInfo() to query device name, firmware name, and data format.
playzerx::PlayzerX::m_DeviceName– textual description of the deviceplayzerx::PlayzerX::m_FirmwareName– firmware identifierplayzerx::PlayzerX::m_DataFormat– e.g. “XYM” or “XYRGB”
if (playzer->GetDeviceInfo())
{
    std::string devName = playzer->GetDeviceName();
    std::string fwName  = playzer->GetFirmwareName();
    std::string dataFmt = playzer->GetDataFormat();

    // Possibly check if the device is RGB capable
    bool isRGB = (dataFmt == "XYRGB");
}
Set Sample Rate#
Use playzerx::PlayzerX::SetSampleRate() to set the output sampling frequency (in samples/second). Acceptable range is typically from 200 to 50,000.
// Set sample rate to 10 kS/s
playzer->SetSampleRate(10000);
Note that the device will clamp out-of-range values to its valid minimum or maximum.
Set Buffer Update Timer#
Use playzerx::PlayzerX::SetBufferUpdateTimer() to enable or disable automatic buffer-level feedback from the device. Setting this timer to a non-zero value triggers streaming of “remaining samples” info from the device at the specified interval (milliseconds).
// Enable buffer updates every 100ms
playzer->SetBufferUpdateTimer(100);

// Disable buffer updates
playzer->SetBufferUpdateTimer(0);
Content Generation and Execution#
Overview of Output Operation#
All user-supplied X/Y coordinate data typically lies within the normalized range of [-1, +1]. For PlayzerX, the device automatically converts these normalized positions into hardware-level signals.
Depending on the device data format (e.g., XYM vs. XYRGB), you may also supply an 8-bit laser modulation value (m for intensity) or three 8-bit color values (r, g, b for red, green, blue).
You can continuously stream data for scanning patterns or you can send point-by-point updates for slower positioning. The main content-sending methods are:
In code, these functions take pointers (or vectors) to X, Y, and optionally M or R/G/B arrays, along with the number of samples, and an optional buffer-level parameter. See the PlayzerX header for exact signatures.
All these methods optionally take a bufferLevelToSend parameter, which allows the internal buffer to be partially emptied before sending new data. This can help avoid jumps in output while streaming.
Point-to-Point or Single Sample#
You can move to a single (x, y) or (x, y, m) or (x, y, r, g, b) point by sending just 1 sample. For instance:
// Move to X=0.3, Y=-0.4, with M=128 (laser half-power)
playzer->SendDataXYM(0.3f, -0.4f, 128);

// Or, for an XY-only device (no laser intensity):
playzer->SendDataXY(0.3f, -0.4f);

// For an RGB-capable device:
// R=255, G=128, B=0 -> Orange color
playzer->SendDataXYRGB(0.3f, -0.4f, 255, 128, 0);
Send a Stream of Samples#
Typically, scanning-based applications require a large buffer of points (e.g. waveforms, images, shapes). With PlayzerX, you create arrays or vectors for X, Y, and possibly M or RGB. Then call one of the streaming methods:
const unsigned int nSamples = 3000;
std::vector<float> xData(nSamples), yData(nSamples);
std::vector<unsigned char> mData(nSamples);

// Fill xData, yData, mData with your pattern or shape...
// e.g., a basic lissajous or some custom shape

// Then send the data
playzer->SendDataXYM(xData, yData, mData);
If the device is already running a previously streamed pattern, it will switch over after finishing the old buffer or once enough buffer space becomes available.
Monitoring and Waiting for Buffer Level#
playzerx::PlayzerX::WaitForBufferLevel() blocks your code until the device’s buffer usage reaches (drops below) a specified threshold. This can be used to synchronize with the scanning, to prevent buffer overflows:
// Wait until only 500 samples remain before sending more
playzer->WaitForBufferLevel(500);

// Next chunk of data
playzer->SendDataXYM(xChunk, yChunk, mChunk, chunkSize);
Clearing the Buffer#
If you need to reset or clear all points from the device’s buffer, call playzerx::PlayzerX::ClearData():
// Stop scanning immediately and flush device buffer
playzer->ClearData();
Additional Data Formats#
If your device (firmware) sets playzerx::PlayzerX::m_RGBCapable to true, you can use RGB scanning:
// Example for an RGB device
unsigned int length = 500;
std::vector<float> x(length), y(length);
std::vector<unsigned char> r(length), g(length), b(length);

// fill data...

playzer->SendDataXYRGB(x, y, r, g, b, length);
Example Scanning Demo#
This section reproduces the ScanningDemo function exactly as it appears in PlayzerX-Demo. It demonstrates generating a Lissajous pattern and continuously sending data to the controller until the user presses a key.
// ScanningDemo demonstrates basic content generation and execution functions
// This demo prepares a lissajous pattern, then sends the data to the Controller
void ScanningDemo() {
    int i = 0, j = 0, k = 0, key, npts = 256 * 40;
    float *x, *y, dt = (float)M_PI * 2.f / npts;
    unsigned char* m;

    // Sample rate and number of points equal, so 1 second of data
    // in one repeated frame.
    playzer->SetSampleRate(npts);

    printf("\nStarting scanning demo...\n\n");

    // Create some sample data
    x = new float[npts];
    y = new float[npts];
    m = new unsigned char[npts];
    while (true) {
        if (j > 0) {
            if (!_kbhit()) continue;
            key = _getch();
            if (key == 224)
                continue;
            else if (key == 27)
                break;
        }
        k = j % 8 + 1; // integer that changes every iteration to generate different Lissajous patterns.

        // Prepare 1 second of data to be repeated
        for (i = 0; i < npts; i++) {
            // X-axis position follows a sin curve from -1.0 to +1.0 (normalized)
            x[i] = sin(10.f * k * i * dt);

            // Y-axis position follows a sin curve from -0.9 to +0.9 at another frequency
            y[i] = 0.9f * sin((5.f * (k + 1) + 1) * i * dt);

            // 8-bit laser modulation (0..255)
            // Here it increases every four samples in a 100-value range
            m[i] = (unsigned char)(156 + (i / 4) % 100);
        }

        // Send data to the controller repeatedly until user input is detected
        do {
            // The call below downloads the entire buffer to the device and
            // starts running it after the current frame ends.
            playzer->SendDataXYM(x, y, m, npts, 10000);
        } while (!_kbhit());

        printf("Cycle: %d. Press any key to change waveform or ESC to exit demo...\n", ++j);
    }

    // Reset beam to center with laser at lowest power
    playzer->SendDataXYM(0, 0, 0);

    SAFE_DELETE_ARRAY(x);
    SAFE_DELETE_ARRAY(y);
    SAFE_DELETE_ARRAY(m);
}
Observations#
The function uses
SetSampleRate()to match the number of points (npts) to the sampling frequency, effectively setting up a 1-second cycle.The main (while (true)) demo loop regenerates a new Lissajous pattern each time the user presses a key, slightly varying the frequencies for each cycle via the integer k.
An additional while (!_kbhit()) loop repeatedly sends the same data buffer to the device, so the controller scans those points continuously until a new key is detected.
Finally, pressing <ESC> exits the loop and sends a single (x=0, y=0, m=0) sample to turn off the beam and move the beam to the center.
Understanding the Effect of Sample Rate and Number of Points#
Below are three example GIFs illustrating how the entire buffer of samples is processed over time by the Controller during the ScanningDemo function. These visualizations show:
Green point is the current sample.
Blue points are samples that have already been output.
Red points are the remaining samples in the buffer that will be output next.
We observe how reducing the number of points (npts) or changing the sample rate affects the effective “speed” at which the pattern is drawn:
512 Points, “Faster” Sample Rate Fewer points in the buffer means each pass is completed more quickly, increasing the perceived refresh or precession rate.#

1024 Points, “Faster” Sample Rate Twice as many points as the 512 case but at the same sample rate, slowing the scan cycle.#
1024 Points, “Slower” Sample Rate The same buffer size as above, but at a slower sample rate, further reducing the Lissajous precession.#
512_faster vs. 1024_faster:
Both use the same (relatively high) sample rate. However, the version with only 512 points in its buffer completes the cycle sooner (higher refresh or precession rate). The one with 1024 points has twice as many samples in its buffer, so it takes longer to complete one cycle at the same sample rate, thus the pattern animates more slowly.
1024_faster vs. 1024_slower:
Both have 1024 points in the buffer. By reducing the sample rate (from “faster” to “slower”), the device traverses these 1024 samples at a slower pace, making the Lissajous figure look less frantic and reducing its precession rate.
Warning
Mechanical resonance and ringing:
When the number of samples you send to the PlayzerX device is small but you maintain a very high sample rate (e.g., the 512_faster scenario), the waveform can become more sparse or “jagged.”
The MEMS mirror inside PlayzerX is a high-Q spring-mass system, so large, rapid excursions can lead to ringing. A low-pass filter (LPF) on the Controller helps mitigate this effect, but users should be aware that low npts + high sample rate can stress the system or cause overshoot in the mirror’s physical response. This typically manifests as a “ringing” effect in the waveform.
Debug and Status Queries#
Check Samples Remaining#
playzerx::PlayzerX::GetSamplesRemaining() retrieves how many points are still in the device’s internal buffer waiting to be executed:
int remaining = playzer->GetSamplesRemaining();
if (remaining < 0)
{
    // Possibly an error or misalignment
}
else
{
    // ...
}
Check Device Running / Connected#
playzerx::PlayzerX::IsDeviceConnected()returnstrueif an active serial connection is open and responding.For advanced usage, you can see if data is actively being processed by checking if the buffer is not empty, or by user-defined logic.
Clearing and Resetting Communication#
playzerx::PlayzerX::PurgeSerialBuffers()flushes any inbound/outbound data.If communication becomes unresponsive, or if the USB cable was briefly unplugged, you may attempt to reconnect.
Example:
if(!playzer->IsDeviceConnected())
{
    // Possibly re-init or re-connect
    playzer->DisconnectDevice();
    playzer->ConnectDevice();
}

// Clear stale data from the buffers
playzer->PurgeSerialBuffers();
Disable and Disconnect#
Disable Outputs#
Before turning off or disconnecting the application, you might want to ensure that the scanning output is idle and the laser is turned off:
// Move the beam to center with no laser power (XYM device)
playzer->SendDataXYM(0.f, 0.f, 0);

// Or just clear all data from the device buffer
playzer->ClearData();
Disconnect Device and Cleanup#
To properly close the connection and free resources, call:
// 1) Disconnect the device (close COM port)
playzer->DisconnectDevice();

// 2) Delete the PlayzerX object
playzerx::PlayzerX::DeleteDevice(playzer);
This releases the serial port handle and all associated memory. Your application can then exit cleanly.
Full Demo Example#
Below is a condensed excerpt of the PlayzerX-Demo application showing initialization, device connection, and scanning loop. For the complete example, refer to the PlayzerX-Demo source file.
#include "PlayzerX.h"
#include <iostream>
#include <conio.h>

using namespace playzerx;

int main(int argc, char* argv[])
{
    // Create device
    PlayzerX* playzer = PlayzerX::CreateDevice();

    // Connect to device (first available)
    playzer->ConnectDevice();
    if (playzer->HasError())
    {
        std::cerr << "Could not connect to any PlayzerX device!" << std::endl;
        PlayzerX::DeleteDevice(playzer);
        return -1;
    }

    // Retrieve basic info
    playzer->GetDeviceInfo();
    std::cout << "Device Name:    " << playzer->GetDeviceName() << std::endl;
    std::cout << "Firmware Name:  " << playzer->GetFirmwareName() << std::endl;
    std::cout << "Data Format:    " << playzer->GetDataFormat() << std::endl;

    // A simple scanning test
    unsigned int npts = 1000;
    playzer->SetSampleRate(npts);
    std::vector<float> xData(npts), yData(npts);
    std::vector<unsigned char> mData(npts);

    // Fill X/Y arrays with a small pattern (e.g., circle)
    for(int i=0; i<(int)npts; i++)
    {
        float t = float(i) * 6.2831853f / float(npts);
        xData[i] = std::cos(t);
        yData[i] = std::sin(t);
        mData[i] = (unsigned char)(128 + 127 * std::sin(4.0f*t));
    }

    std::cout << "Press any key to start scanning circle pattern...\n";
    _getch();

    // Send data repeatedly until user presses a key
    while(!_kbhit())
    {
        // Wait for free buffer space
        playzer->WaitForBufferLevel(500);
        playzer->SendDataXYM(&xData[0], &yData[0], &mData[0], npts);
    }

    // Clean exit
    playzer->SendDataXYM(0.f, 0.f, 0);
    playzer->DisconnectDevice();
    PlayzerX::DeleteDevice(playzer);

    return 0;
}
Next Steps#
Refer to the provided PlayzerX-Demo for a comprehensive, interactive example illustrating device setup, basic scanning, advanced audio-driven waveforms, and user-controlled interactive demos. Be sure to handle error conditions gracefully, disable outputs when not in use, and properly disconnect the device upon completion.